

New blog is located at http://www.blog.sugrue.com.
Monday, January 24, 2011
Monday, March 1, 2010
Still tired
Here's a quick BTS video I made from the shoot in the previous post, as well as a couple stills from last weeks commercial project in Vancouver.

© Michael Sugrue

© Michael Sugrue
Thursday, February 11, 2010
Like a duck.
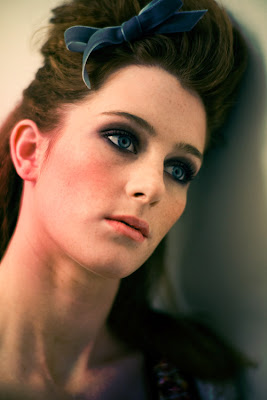
While the blog's been quiet, my feet have been in constant, feverish motion for the last month. Here's a couple images from a shoot in-studio yesterday.


© Michael Sugrue
© Michael Sugrue
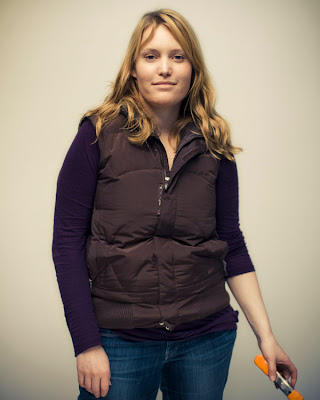
Assistant Jen Wilson, © Michael Sugrue
As far a the new blog, it just needs my time to actually enter all of the new material, as it's been expertly designed by Emelie Ivansson, a very talented, young Swedish designer based in London. There will be multiple categories including Workflow + Tech, creative inspiration from around the web, studio news, a photo stream of uploaded images, behind the scenes/interviews, and random musings on the state of the world.
Enough with talking about it. I'm trying to carve out some time soon to actually get it up and running.
Enough with talking about it. I'm trying to carve out some time soon to actually get it up and running.
Tuesday, December 29, 2009
New Sugrue HQ
Just signed a lease on a new studio space with plenty of awesome Sausalito light. Working like crazy to get it operational. A lot of changes in the next several weeks.


Friday, December 18, 2009
RED update
A couple of technical updates to the previous post about my RED workflow. You'll definitely need Final Cut Studio 3, which includes Color 1.5, in order to take full advantage of 4k RED footage. The previous version of Color only allows up to 2k output back to Final Cut.
Second, there's a bug called the "looping bug" in Color where you can't adequately play back clips within Color. Download ColorFixer for free for a super simple workaround. It somehow "fixes" your Color .colorproj files to function properly.
Thanks to Eric Escobar for helping me sort that out.
Wednesday, December 9, 2009
RED/5D workflow
Since this was the first time I shot with the RED, I enlisted the help of my friend (and LucasFilm employee) Sean Wells. He came over to work me through the idea of editing, grading, and outputing RED footage.
First, a disclaimer, or a quest for knowledge, whatever. I'm by no means an expert at this, and this may not be the best workflow for everyone, or even for me. If you know of a better way, please let me know.
It ended up being MUCH more simple than anticipated. RED creates quicktime proxy files to edit from, which puts much less pressure on your GPU than full-res 4k RED files. These proxies come in half, quarter, and eighth resolution, and ultimately reference the large R3D files when you're ready. I have two types of footage to deal with, the interview and b-roll. I imported the smallest quicktime proxies to edit the interviews first, so the client has something to chew on while I'm dealing with the b-roll, sound, graphics, color, etc.
RED proxies on the right. Each references the large files, but makes it much easier to start editing.
After importing everything to Final Cut and dropping them in a timeline, I converted the whole thing to ProRes 422 in the "Sequence Settings" dialogue (command-0) > "Quicktime Video Settings". This basically makes the footage smooth and editable, otherwise it's jumpy because the filetype isn't native to FCP. I chopped up the footage so it's just the interviewee talking and output a quicktime movie (without video) and sent it to Perfect Pages in Oakland for transcription. Then I output another quicktime (this time with video) and uploaded it to vimeo. At this point, the video is just an uncorrected shot of the interviewee with a timecode overlay.
I create a custom page for my clients so they have an address to view, and provide feedback on, the linear progression of the project. I highly recommend Vimeo Plus. It costs like $50/year and you can customize the player on your videos, and upload 5GB without incurring the costs of hosting them yourself. Works very well and allows me to keep it all within my branding with (nearly) none of the heavy lifting. Anyway, then I send the link to the client, along with the transcription in Word format. Shirley at Perfect Pages usually gets it turned around in a day or two. Now the client is looking at the video, but relying heavily on the transcription to get the necessary talking points across. I'll get back a version of the transcription with important sound highlighted, and round and round we go.
Screen grab of the custom site for clients to view the progression of editing versions.
After a few rounds to get it down to an acceptable length and narrative order, I'll start to drop in the b-roll and graphics. With this video, I'm at the point where the v1 of the rough edit is pending approval, so I'm pretty much ready to go to Color. This is where my little tutorial session with Sean comes in. We tested sending some of the small proxy footage to Color to see what happens. In the past, you had to output DPX files, essentially manually referencing the R3D footage. Not incredibly difficult, but a little more technically intensive than I care to deal with.
And then the magic happened. The footage I sent to Color (the smallest of the proxy files) from the FCP timeline was 480x280px. Pretty much iPhone size. Without doing anything, I realized I was now correcting full R3D files. I accessed the RED tab in the Primary In room and adjusted exposure/color/levels/etc., similar to RedCine-X or Adobe Bridge (for stills). We played with the resolution to make sure, made some ridiculous corrections, and sent it back to FCP. Just like that, we were looking at the real deal. So, apparently the newest version of Color automatically references the big stuff, with no back-end technical connections to make.
Primary In room of Apple Color, showing RED tab on far right.
Once I send it back to FCP, I can still make refined frame-accurate edits, then output to taste. One wrinkle of this project is that I shot some b-roll and an alternate interview angle with the 5D. The RED is at 23.98fps, while the 5D is at 30fps. In the course of refining my b-roll material, I created two timelines, one for RED, another for 5D stuff. Once I got the 5D stuff down to a manageable length, like a handful of clips, I used Philip Bloom's tutorial on converting 5D footage to 24p. I had to manually chop it up and copy/paste each clip into my final 24p timeline. That will definitely change once the people at Canon finally give us proper 24p capture, hopefully in early 2010.
All in all, the only issue (so far) is combining footage from the RED and 5D. My initial impression of the RED, at least on set, was that it's a little overrated. It's WAY heavier than I thought, and even in post, the images from the 5D seem to compare favorably. Just ask Shane Hurlbut, a very talented evangelist for the 5D. But it seems that the RED really begins to shine in Color, and can handle much more image manipulation than the 5D. Both have their benefits and drawbacks. If there's anyone out there who's done this workflow, as well as combining the two cameras, please let me know how it's worked for you, as I'm keen to do this better/faster/easier the next time.
Subscribe to:
Posts (Atom)